I LOVE my job!! I am so fortunate to make money doing something I love. I am a Personal Publishing Consultant with Heritage Makers, an online digital publishing company where you can create custom digital scrapbooks using a state of the art web based interface. It's an amazing concept of preserving heritage and I love helping others do it.
Before I became a Heritage Makers consultant I had boxes of photos that sat in my scraproom. Sure I did layouts every now and then and was slowly finishing up a few books but now my photos have come to life in beautiful digital storybooks that are making a difference in my family. I am blessed to be able to help others do the same and teach them digital scrapbooking through the unique and user friendly system that Heritage Makers offers. I am grateful for the opportunity to grow and learn so much about myself as well as have found a great new hobby . . . digital storybooking!!!
I became a consultant in September of 2011 and I have LOVED every moment of it so far! From the workshops to the one-on-ones to getting my own completed books in the mail it is all wonderful! I am sure that you are going to LOVE it just as much as I do!
I created a new BLOG so that I can share with you how it works, how you can become the heritage maker in your home and so I can share my passion about this incredible company and their AMAZING products! Visit my new blog here: TANGIBLE STORIES!
Please take some time to look over all of the links provided there and feel free to sign up for a FREE Heritage Makers account! In the future look for posts on how to sort your digital photos, how to create with them, ideas and more! I look forward to helping you turn your photos into TANGIBLE storybooks your families will love and cherish!
--Sara

Thursday, April 12, 2012
Saturday, November 5, 2011
Time for a GIVEAWAY!!!! Free Heritage Makers Points!
So Heritage Makers recently released a new TOUR on their website! You can see what Heritage Makers is all about! There are videos, FAQ's, and more!! If you are not familiar with Heritage Makers this is a great way to get to know it! I have been working with the program for about a month and a half and I love it! It is an online digital scrapbooking tool! With over 7,000 templates to use and MANY digital kits that you have access to as a CLUB HM member! Over 60,000 pieces of digital art!
So here is where the giveaway part comes in! I love HM so much I am sure that you will to so I am giving away 20 Heritage Makers publishing Points to 1 lucky person! ($20 value)
ALL you have to do is take the tour and then post here in the comments that you took the tour and 1 thing you like about the Heritage Makers program!
TAKE THE TOUR: http://www.heritagemakers.com/tour/
ALSO:
If you sign up as a CLub HM Member by this Wednesday I'll add 20 extra points to your account! SO you are doubling your money!! Simply send me an e-mail for more info! wiseguys@mtaonline.net
I will be doing the drawing from the comments on Thursday!!!!
Happy Scrappin'!
Wednesday, October 19, 2011
A new venture!!!
So I have officially started my own business! I am a Personal Publishing Consultant with Heritage Makers.
For those of you who have not heard of Heritage Makers let me tell you more about it! Heritage Makers is an online DIGITAL scrapbooking company! You can create storybooks in mere days using templates and their online Studio software! And you can create MORE than just storybooks! You can make custom canvas's, cards, layouts, playing cards, posters and more! AND you get to create it and every project is FULLY customizable.
You can see more by visiting my website here:
www.heritagemakers.com/sarawise
From there you can create a FREE Basic account and have a look around! And if you'd like to get started creating I would love to get you signed up with Club HM! A FANTASTIC way to save money on all your publishing needs all year long!
Invest in your memories!!!
October Kit with Scraptique Boutique!
A fun 2 page layout using supplies from the October kit and the Add-on kit! These kits are fabulous and are great for all kinds of photos! From parties, fall festivals, and halloween parties! Even great for all those dress - up photos!

And here is a great tip: If you want to get more photos on a layout (for instance this layout alone has 16 photos!!) then print a few wallet size! I used my litle ...4x6 photo printer and printed 12 of the photos a 2 x 2 3/4 size. This allowed me to get ALL of my favorite photos from the event on ONE layout! This may seem like a lot of photos on one layout but from looking at the layout you can see there is still plenty of room for journaling and fun embellishments! I challenge you to do the same! Print out some wallet size photos and get more on the page!
Visit Lanita's facebook page here to order your kit!!
Tuesday, September 13, 2011
September Scraptique Boutique kit! Layouts and some tips!
I absolutely love this kit! The colors are FAB and coordinate so well with ANY theme you may be working with! I have a tutorial for a mini-album in the next post so be sure to check that out! Click here to get there faster!
This first layout is an outdoor theme! Kids smiling after a ride on the ATV. And of course the sticker quote works awesome on this layout with these photos! (the one about the nuts! LOL!!)

Now on the bottom you'll see the wood pieces that came in the kit! I wasn't sure what to do with these at first, but by combining them into one swirly and putting a flower over the center to hide the wierd way they connected it created a fun addition to my layout. Add some stickles to finish it off and voila!

On the side here I had a blank spot that was really bugging me and the word strips on the large sticker sheet that came in the kit really filled the space perfectly! This is a great way to fill space without cluttering it up and to help TELL the story!

This layout is a family themed layout. I LOVE how it turned out!

A few up-close photos. The teeny tiny letters are a great way to add a sub-title to your layout and some extra journaling. I used them here on this layout to add our names. The stick pins are fun! I loved the hearts with the pearls and wanted them on here and so I added one behind the journaling at the top and then one to the side of the photos. I liked how the pin showed! I just added some 3-in-1 glue to the back of the heart and it stuck where I wanted it. The long journaling sticker strip on the sticker sheet was a great way to divide the photos, add some interest, and some extra journaling!


Happy Scrappin!!!! Keep on to the next post to see a tutorial for a mini-album!
Mini-Album Tutorial using the September Scraptique Boutique kit!
So the September Scraptique Boutique kit is awesome! I LOVE the Jillibean Soup papers! The whole kit just coordinated very well which made this whole project EASY and QUICK to put together! To see the complete Scraptique Boutique kit go here or here!
Here is what we'll be making:

Now creating this is SOOO simple:
1. - 1 piece of 12’ x 12” cardstock, score in one direction at 3-3/4” and 4” and again at 8” and 8-1/4”. Rotate and score at 4” and 8”
2. - Cut off the 4 outside corner pieces and save the cardstock for matting photos
3. - On the side that does not have the extra scores, cut off about 1/8” from the top so it folds easily without getting crushed and cut off 2-1/4” from the opposite side on just the center piece leaving it 1-3/4” long.
4. - And then fold in on all the score lines
These photos show you what you should have at this point:

I then rounded all the corners with my Corner Chomper. (on the 1/2" side) You could leave the corners straight if you wanted to but I think rounded corners just look better!

Now for the details:
I'll tell ya what I did here and then after you can see all the photos of the book so you can see it!
1. You can now add papers to the book! What you add is up to you.
- All papers EXCEPT for the MIDDLE piece are 3 1/2 x 3 3/4. The middle piece is 3 3/4 x 3 3/4
2. You'll notice I added a "book" piece to both of the side panels. To create this
- Cut a piece of cardstock at 5 1/2 x 3 1/2 and then score at: 3, and 3 1/4
- When adding to the panel simply add a strip of glue down the part between the score lines and add! You can then
add your details to it. OR you can scrap it up and then add to the panel!
3. The book is closed using a
*3x1 3/4 strip of cardstock and a strip of 2 3/4 x 1 1/2 piece of patterned paper
*Glue it to the BACK of the book so it can wrap around to the front to close
* I added one of the flowers from the kit to the end of the strip and put a magnet to the back of it and a magnet to the front of the book to keep it closed. You could also use VELCRO instead of a magnet.


HAPPY SCRAPPIN!!!! And as always you can e-mail me at wiseguys@mtaonline.net if you need any further clarification on any of the steps!
Sara
Friday, August 12, 2011
Tutorial: Mini-Album using a 2 pocket folder!
Good Morning Everyone! Today I"m going to share with you a TUTORIAL! This project was created for CLUB RUBY DESIGNS using the CLUB RUBY AUGUST KIT! I am a member of their design team and create fun projects tutorials each month that are posted on the website for Club Ruby Advantage members! This month we were given the ok to post one of these projects on our blog so here we are!
This project is one that can be created using MANY different themes. I've made ones for Christmas list shopping (used it to store photos of doing that and receipts and christmas lists and much more), I've made Travel themed ones, baby ones, etc..... and since they are so CHEAP to make and super simple you can make them for gifts and such super quick!
Here is what we are making today. It's a family themed one:


Here is how to make it:
Prepare Your Folder/Album:
I used a Two Pocket Folder. These are paper ones. Not plasticky and they do not have prongs.
1. Fold your folder in half and then in half again. I used a bone folder to make sure my creases were set and it was good and folded.


Adding Papers to the Album:
For the inside of the album:
the dimensions of the papers are:
* for the 4 long panels: 7 1/2 x 4 1/4 (you can see in the 2nd photo here that the paper does not go all the way down the pockets. This is to save paper and because you can't see down there anyway! LOL!)
* For the front of each pocket: 4 1/4 x 4 1/4 (back layer) and 3 3/4 x 3 3/4 for the front layer.
* Ink each piece before adhering to the folder.


For the outside of the Album
the dimensions of the papers are:
*4 1/4 x 11 1/2
When adding paper keep in mind the paper on the FAR LEFT is going to be your COVER! (in this case the dark paper with the orange, blue, and red flowers)
*Ink each piece before adding to the folder.

This is going to go on the panel that will be the BACK of the album. (in this case the one of the FAR LEFT - orange paper with white swirly flowers)
1. For this Cascade "album" you'll need to cut various papers from the kit (cardstock and patterns) in the following dimensions:
4 x 11
4x 10.5
4x 10
4x 9.5
4 x 9
4 x 8.5
4 x 8
4 x 7.5
4 x 7
4 x 6.5

2. You'll then want to punch holes in the top of this panel. ONLY through this panel. NOT through all 4.
3. You'll also want to punch holes in the TOP of the cascade album
4. Before you go to the next step - if you like to ink your papers then do so now

5. Once you have your holes punched - use a piece of ribbon from the kit and tie it on the album! Double knot it and make sure it's tight!

Now let's embellish the album!

** Panel 1 (all the way on the right) has the cascade album behind it so you'll see the ribbon you tied through. I glued a button to the inside of one of the flowers on the patterned paper. For this pocket I used pieces from the die-cut sheet that came in the August kit and a piece of ribbon I cut off from the cascade album tie.
** Panel 2 - For this panel I left it alone. For the pocket I added a bird on a banner! This is from the Birthday Bash Cartridge. To see how I created this using the Paper Layerz paper go here: http://www.clubrubydesigners.com/designer/1540/creations/paper-layerz-the-gypsy-and-my-e2-tutorial-2/3290
**Panel 3 - For this panel I used a star stamp and stamped a row of stars at the top. For the pocket I adhered an owl I cut using the Paper Layerz paper. To see how and get dimensions for the owl please go here: http://www.clubrubydesigners.com/designer/1540/creations/paper-layerz-the-gypsy-and-my-e2-tutorial-1/3289
-->This panel (on Panel THREE still) - I created a pull out "album" to go in the owl embellished pocket. Here are 3 photos that show this pull out album:


To do this:
Cut a piece of cardstock 8 x 10/5 and fold in half
For the front of this cut 3 photo mats 3.5 x 3
I stamped a sentiment on the top and then used the white pen in the August kit to outline it all
The inside of this pull out "album":
On the left side: orange piece is 3.5 x 3 1/8; Brown polka dotted stripe piece is 3.5 x 3/4; and the flower piece is 3.5 x 6
On the right side: the light blue cardstock piece is: 3 3/4 x 8 1/4
Add 3 flowers to the bottom of the right side. Adhering a button to the center of each one. Add a small bird to the bottom of the light blue piece. (from the die-cut sheet in the August kit) Stamp a small sentiment under the cardstock sheet and using the white pen draw on some white dots
For the back of this pull out "album:
Cut a piece of patterned paper 3 3/4 x 10. Ink then add to the "album"
Glue a 4" strip of ribbon to the middle of the patterned paper
I then added a few flowers, a button, and some leaf pieces from the august kit to embellish it up.
Slip this piece into the Mini-Album
Now back to the MAIN album:
4. For the last panel inside the album - I left this piece alone and added a sun from the die-cut sheet in the August kit to the pocket piece and a large orange button from the embellishment bag in the kit to the center of the sun.
THE INSIDE of the MINI-ALBUM is now DONE!
Moving on to the Back Side of the Album!

1. The first panel that we'll work on is going to be our cover! In the first photo here it's the panel all the way on the left!
Add a title to the top of this panel using thickers or other letters that you may have! Use a dymo labeler to help with your title!
Add buttons to the inside of the flowers on the papers and add a few paper flowers. I also added a small bird from the Die-Cut Sheet.

2. For the panel that is next to the cover I added a 3.5 x 3x5 piece of cardstock. On this piece I added a 3 1/4 x 1/2 piece of patterned paper, a dymo labeled word and a tree from the die cut sheet in the kit.

3. For this panel that is next to the "cascade album" panel - I cut 2 pieces of cardstock 3 3/4 x 3 1/2 for the top one and 3 3/4 x 3 3/4 for the bottom one. I added a bird from the diecut sheet in the kit and 2 buttons.

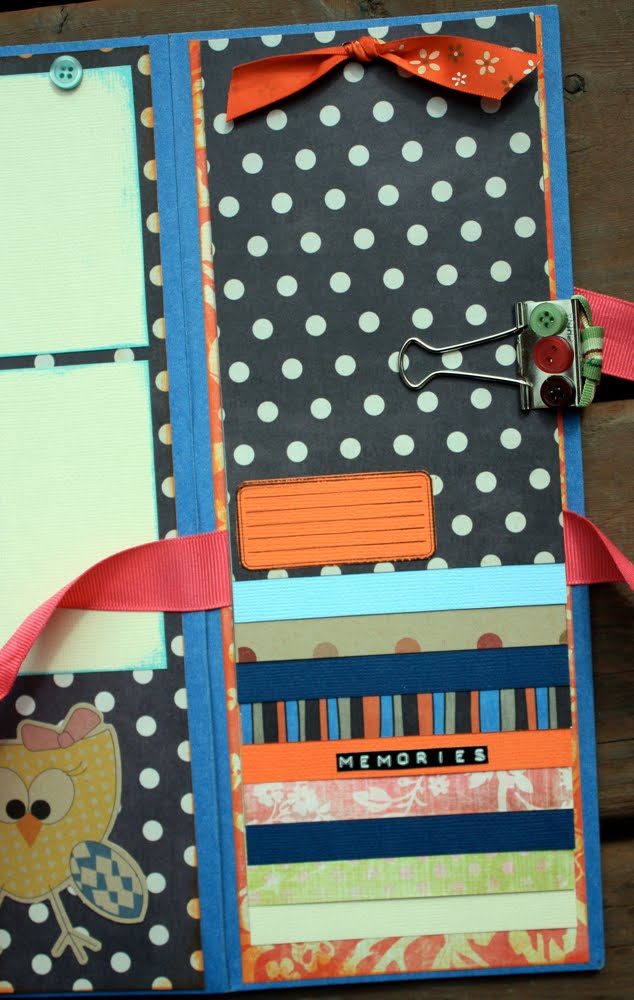
4. Embellishing the "cascade album:
To help keep the cascade album secure I added a binder clip to the side. I tied a ribbon on top of it (secured with hot glue) and then added 3 buttons to the this side and a dymo labeled word to the other side. I then added a journaled piece to the shortest piece of the album and added a dymo labeled word to one of the pieces of the album.

5. Now for the tie that keeps it all closed
The panel that has the "cascade album" on it is where we attach the ribbon. This piece of ribbon is about 28" long. Lift up the Cascade Album and glue it down all the way across. Make sure it's down good! I used hot glue for this task. (you'll also notice that I glued down the longest sheet of the cascade album to the orange and white patterned paper piece. THis helps add stability to it.
Then you can close the album and tie the ribbon across the front cover panel!

Now you can give as a gift or add photos etc.... If you have any questions about this project feel free to e-mail me at wiseguys@mtaonline.net!
Also I make these and sell them for $20 if interested! Just tell me your theme and I'll create one for you!
Happy Scrappin'!
This project is one that can be created using MANY different themes. I've made ones for Christmas list shopping (used it to store photos of doing that and receipts and christmas lists and much more), I've made Travel themed ones, baby ones, etc..... and since they are so CHEAP to make and super simple you can make them for gifts and such super quick!
Here is what we are making today. It's a family themed one:


Here is how to make it:
Prepare Your Folder/Album:
I used a Two Pocket Folder. These are paper ones. Not plasticky and they do not have prongs.
1. Fold your folder in half and then in half again. I used a bone folder to make sure my creases were set and it was good and folded.


Adding Papers to the Album:
For the inside of the album:
the dimensions of the papers are:
* for the 4 long panels: 7 1/2 x 4 1/4 (you can see in the 2nd photo here that the paper does not go all the way down the pockets. This is to save paper and because you can't see down there anyway! LOL!)
* For the front of each pocket: 4 1/4 x 4 1/4 (back layer) and 3 3/4 x 3 3/4 for the front layer.
* Ink each piece before adhering to the folder.


For the outside of the Album
the dimensions of the papers are:
*4 1/4 x 11 1/2
When adding paper keep in mind the paper on the FAR LEFT is going to be your COVER! (in this case the dark paper with the orange, blue, and red flowers)
*Ink each piece before adding to the folder.

This is going to go on the panel that will be the BACK of the album. (in this case the one of the FAR LEFT - orange paper with white swirly flowers)
1. For this Cascade "album" you'll need to cut various papers from the kit (cardstock and patterns) in the following dimensions:
4 x 11
4x 10.5
4x 10
4x 9.5
4 x 9
4 x 8.5
4 x 8
4 x 7.5
4 x 7
4 x 6.5

2. You'll then want to punch holes in the top of this panel. ONLY through this panel. NOT through all 4.
3. You'll also want to punch holes in the TOP of the cascade album
4. Before you go to the next step - if you like to ink your papers then do so now

5. Once you have your holes punched - use a piece of ribbon from the kit and tie it on the album! Double knot it and make sure it's tight!

Now let's embellish the album!

** Panel 1 (all the way on the right) has the cascade album behind it so you'll see the ribbon you tied through. I glued a button to the inside of one of the flowers on the patterned paper. For this pocket I used pieces from the die-cut sheet that came in the August kit and a piece of ribbon I cut off from the cascade album tie.
** Panel 2 - For this panel I left it alone. For the pocket I added a bird on a banner! This is from the Birthday Bash Cartridge. To see how I created this using the Paper Layerz paper go here: http://www.clubrubydesigners.com/designer/1540/creations/paper-layerz-the-gypsy-and-my-e2-tutorial-2/3290
**Panel 3 - For this panel I used a star stamp and stamped a row of stars at the top. For the pocket I adhered an owl I cut using the Paper Layerz paper. To see how and get dimensions for the owl please go here: http://www.clubrubydesigners.com/designer/1540/creations/paper-layerz-the-gypsy-and-my-e2-tutorial-1/3289
-->This panel (on Panel THREE still) - I created a pull out "album" to go in the owl embellished pocket. Here are 3 photos that show this pull out album:


To do this:
Cut a piece of cardstock 8 x 10/5 and fold in half
For the front of this cut 3 photo mats 3.5 x 3
I stamped a sentiment on the top and then used the white pen in the August kit to outline it all
The inside of this pull out "album":
On the left side: orange piece is 3.5 x 3 1/8; Brown polka dotted stripe piece is 3.5 x 3/4; and the flower piece is 3.5 x 6
On the right side: the light blue cardstock piece is: 3 3/4 x 8 1/4
Add 3 flowers to the bottom of the right side. Adhering a button to the center of each one. Add a small bird to the bottom of the light blue piece. (from the die-cut sheet in the August kit) Stamp a small sentiment under the cardstock sheet and using the white pen draw on some white dots
For the back of this pull out "album:
Cut a piece of patterned paper 3 3/4 x 10. Ink then add to the "album"
Glue a 4" strip of ribbon to the middle of the patterned paper
I then added a few flowers, a button, and some leaf pieces from the august kit to embellish it up.
Slip this piece into the Mini-Album
Now back to the MAIN album:
4. For the last panel inside the album - I left this piece alone and added a sun from the die-cut sheet in the August kit to the pocket piece and a large orange button from the embellishment bag in the kit to the center of the sun.
THE INSIDE of the MINI-ALBUM is now DONE!
Moving on to the Back Side of the Album!

1. The first panel that we'll work on is going to be our cover! In the first photo here it's the panel all the way on the left!
Add a title to the top of this panel using thickers or other letters that you may have! Use a dymo labeler to help with your title!
Add buttons to the inside of the flowers on the papers and add a few paper flowers. I also added a small bird from the Die-Cut Sheet.

2. For the panel that is next to the cover I added a 3.5 x 3x5 piece of cardstock. On this piece I added a 3 1/4 x 1/2 piece of patterned paper, a dymo labeled word and a tree from the die cut sheet in the kit.

3. For this panel that is next to the "cascade album" panel - I cut 2 pieces of cardstock 3 3/4 x 3 1/2 for the top one and 3 3/4 x 3 3/4 for the bottom one. I added a bird from the diecut sheet in the kit and 2 buttons.

4. Embellishing the "cascade album:
To help keep the cascade album secure I added a binder clip to the side. I tied a ribbon on top of it (secured with hot glue) and then added 3 buttons to the this side and a dymo labeled word to the other side. I then added a journaled piece to the shortest piece of the album and added a dymo labeled word to one of the pieces of the album.
5. Now for the tie that keeps it all closed
The panel that has the "cascade album" on it is where we attach the ribbon. This piece of ribbon is about 28" long. Lift up the Cascade Album and glue it down all the way across. Make sure it's down good! I used hot glue for this task. (you'll also notice that I glued down the longest sheet of the cascade album to the orange and white patterned paper piece. THis helps add stability to it.
Then you can close the album and tie the ribbon across the front cover panel!

Now you can give as a gift or add photos etc.... If you have any questions about this project feel free to e-mail me at wiseguys@mtaonline.net!
Also I make these and sell them for $20 if interested! Just tell me your theme and I'll create one for you!
Happy Scrappin'!
Subscribe to:
Posts (Atom)